Showing posts with label cake. Show all posts

Saturday, 3 August 2013

Summer Berry Drizzle Loaf Cake


Sometimes, an irresistible baking urge will creep over me, and I am left with no choice but to bake. However, this means overcoming an annoying (all be it probably practical) rule put in place by my Mother to prevent me baking every single day; I am not allowed to bake without an excuse.

An excuse soon cropped its head up though, in the form of six hungry men doing a days work on a farm together. My Dad was more than pleased when I offered to bake a cake for him to take along, so I went for something simple and portable.

This cake definitely isn't a visual stunner, but it gets 10/10 from me for taste. Here's the recipe:

Ingredients:
175g very soft butter 
175g golden caster sugar
250g self raising flour 
2 large eggs 
2 tsp vanilla extract 
175g mixed summer fruits, stoned (I used strawberries, raspberries, blackberries, and a few cherries.) - I actually used closer to 275g and the cake turned out perfectly... 
140g granulated sugar 
1-2tsp lemon juice 

Method:
Heat the oven to 180 degrees Celsius (160 fan). Grease a 900g loaf tin and line the base and ends with a long strip of baking parchment.

Put the butter, sugar, flour, eggs and vanilla extract into a large bowl and beat with an electric hand mixer for 5 minutes until pale an creamy. The mixture will be very thick. 


Spread one third of the mix into the tin, then scatter over some of the fruit. Carefully dot and spread over another third of the mix, and scatter with some more fruit. Dot the rest of the mix over and gently spread with the bake of a spoon. You will have some fruit left but this will be used for the topping. Bake for 1 hour.


Remove the cake from the oven. Dot all over the top with a skewer. Put remaining fruit in a bowl with the granulated sugar and the lemon juice and mash/stir. Spoon over the cake. Leave in the tin until the cake is cool and the topping is set and crisp.


This is such a super simple summer bake that you really have no excuse not to bake it. Although I didn't get a chance to guzzle more than half a slice before my Dad whipped it away, I bet it would be beautiful with a dollop of whipped cream or creme fraiche.

Tuesday, 30 July 2013

Orange & White Chocolate Cake


My Granny is one of the most lovely ladies I know. She has a heart of gold and I think each of my four sisters would agree with me when I say she's the best Granny we could ask for; she never forgets a birthday, sends me the loveliest cards before every single one of my collections at university, and I frequently open my inbox to find a chatty email from her. (Yeah, she's completely down with the text and internet thing too - 21st century Granny!)

I also know that she is one of my most dedicated followers (Hi Granny!), and for that if nothing else she deserves a marvelous birthday cake! I fancied baking a cake a little lighter than my previous two monsters (Lime & Pistachio and Chocolate Honeycomb). This cake seemed perfect: light and refreshing, just what we needed after a delicious lunch at a local French-style cafe.

This recipe, with some minor alterations, is from The Clandestine Cake Club Book. I used my neighbour's chickens freshly laid eggs for extra freshness. There's nothing like baking with eggs quite that local!

Ingredients:
225g butter, softened
225g caster sugar
4 large eggs, beaten
225g self raising flour
zest of 1 large orange
1/2 tsp baking powder
1 tbsp milk
icing sugar, to dust
orange slice, to decorate
(I also added a teeny weeny bit of orange juice, and a drip-drop of vanilla essence)
For the orange syrup:
grated zest and juice of 1 large orange
1 tsp orange blossom water or 2 tsp Cointreau
1 tsp caster sugar
For the white chocolate icing:
150g white chocolate
grated zest of 2 large oranges, plus 4 tbsp juice
200g butter, softened
75g icing sugar

Method:
Preheat the oven to 190 degrees Celsius (fan 170). Grease and line two 20cm round sandwich tins.

Beat the butter and sugar until light and fluffy, then add the eggs gradually, beating well after each addition, and adding a tablespoon of flour with the final addition to help prevent curdling. Mix in the orange zest, then fold in the remaining flour and the baking powder until thoroughly combined. If the mixture looks a little stiff then add a little milk.  (I didn't need to as I added some orange juice.)


Divide the mixture between the tins and bake for 20-25 minutes (mine took 25 mins but it completely depends on your oven.) Leave in the tins to cool slightly.


Meanwhile, make the syrup. Put the orange zest, juice, orange blossom water, and sugar into a pan over a low heat and stir until the sugar has completely dissolved, then bring to a simmer. Remove from the heat and leave to cool a little. Turn the cakes out of the tins onto a wire rack, then spoon the syrup over the two sponges. Do not over soak them - you may not need all the syrup. Leave the cakes to cool completely.


To make the chocolate filling, place the chocolate in a heat proof bowl. Put the orange zest and juice in a small saucepan and bring to the simmer. Simmer for a couple of minutes, then pour over the chocolate. Stir until thoroughly combined and the chocolate has completely melted. If it does not fully melt, set the bowl of chocolate mix over a pan of simmering water and stir gently. Set aside to cool COMPLETELY. 


In a separate bowl, beat the sugar and icing sugar until light and fluffy. Gradually add the COLD chocolate, beating all the time, until thoroughly combined. (BE WARNED: IF THE CHOCOLATE MIXTURE IS STILL WARM IT WILL MELT THE BUTTER AND THE MIXTURE WILL SPLIT!!)

Sandwich together the cooled cakes with the filling, then dust the top with icing sugar and decorate with a slice of orange.

Here's a picture of Granny herself cutting a slice of cake. The sponge was beautifully soft and fluffy, a darn good bake even if I do say so myself! It was just the right way to end a very happy day.


If you like the look of this but fancy something a little more exotic, then try this Passionfruit Cake for an equally refreshing summer treat. 

Sunday, 30 June 2013

Pistachio & Lime Cake


This cake forms the impressive front page of my new favorite book: "The Clandestine Cake Club Book". Needless to say, it looks wonderfully impressive, and I couldn't not attempt to replicate it.

When I rang my Nan up to ask if she needed a birthday cake for her big day on Sunday 30th, she jumped at the oppurtunity. Just another excuse for a Matthews family get together really! Drinking tea and eating cake is what we do best.

I am an absolute pistachio fiend, another reason why this recipe leaptoff the page at me. One of my main memories of summer holidays with my family in France is bags full of the things, spending hours and hours cracking their shells off and munching away with my Dad. The pistachios added a lovely crunchy texture in between mouthfuls of soft sponge and creamy lime frosting.

Ingredients:
For the sponge:
300g butter
300g caster sugar
5 eggs
300g self raising flour
1 tsp baking powder
grated zest of 3 limes, plus the juice of 2
50g pistachio nuts, finely chopped
Lime syrup:
juice of 2 limes
2tbsp caster sugar  
*NB - This is the amount given by the recipe. If I were to make this cake again, I'd     make double the amount of syrup, as it was just so zesty and scrummy*
Lime curd:
60g butter
2 eggs
170g caster sugar
grated zest and juice of 3 limes
Frosting and decoration:
250g butter
200g full fat cream cheese
grated zest of 1 lime
250g icing sugar
75g good quality dark chocolate
125g pistachio nuts

Method:
Preheat the oven to 190 degrees Celsius (170 fan) and line three 20cm round sandwich tins.

Beat the butter and sugar until light and fluffy.


Add the eggs one a a time, beating well after each addition. Fold in the flour and the baking powder until thoroughly combined. Add the lime zest and juice and the finely chopped pistachios and mix until well combined.


Divide the mixture between the tins, spreading evenly. Bake for 25-30 minutes. Leave in the tins to cool slightly.


Meanwhile, make the syrup. Put the lime juice and sugar into a pan over a low heat and stir until the sugar has completely dissolved, then turn up the heat until the mixture simmers. Remove from the heat and leave to cool.

While the sponges are still warm turn them out of their tins onto a wire rack. Spoon the lime syrup over the top of each. Leave the cakes to cool completely.

Put all the ingredients for the lime curd into a small, heavy based pan. Heat gently, stirring constantly with a wooden spoon - don't let the mixture boil or the eggs will scramble. When it has thickened enough to coat the back of a spoon, strain through a sieve into a bowl. Cover and leave to cool.


To make the frosting, beat the butter until smooth. Add the cream cheese and mix until combined. Add the lime zest, then beat in the icing sugar.


For the decoration, melt the chocolate in a bowl set over a pan of gently simmering water. Pour the melted chocolate onto a sheet of baking parchment and spread it out with a palette knife so it is about 3mm thick. Scatter over some chopped pistachios and leave to cool and set.


To assemble the cake, place one of the cooled sponges on a plate, spread with a third of the frosting, then cover with a generous layer of he lime curd. Add a sprinkling of pistachio nuts. Repeat with the next layer, and then place the final cake on top and cover with the remaining frosting. Feed the remaining curd to a willing recipient, ie your Mum.


Break the pistachio coated dark chocolate into rough shards and scatter these over the top of the cake.


Here's my beautiful Nanny slicing into her birthday cake in her back garden. Needless to say, it went down very well; my Auntie Chris devoured two slices and i'm pretty sure Nan snaffled the rest of the cake away too eat herself this evening. 

Saturday, 29 June 2013

The Mother of All Cakes


Initially named "Sweet n Salty Chocolate Cake",  I've wanted to bake this for a very very long time, and my (Honorary) Grandpa Ian's birthday provided the perfect opportunity. The story behind the "honorary" epithet is long. Basically, despite not being a blood relation, Ian has for some time now been an essential member of our family. He holds an important part in all of our hearts, hence why we wanted to make his 80th birthday extra special for him. Until recently, I hadn't seen him for over a year, but this Saturday we all went down to London to celebrate with him. We all turned up at his favorite restaurant to surprise him with lunch, a day out, and of course - a rather magnificent cake.

At Christmas time, we always used to joke about how Ian could manage one of every pudding: and there were usually five or six options! He has an insatiable sweet tooth, something that I never cease to try and satisfy. Hopefully, this cake will do the trick! The sheer volume of sugar and glorious fatty goodness is just too decadent for anyone to pass up, especially Ian. This is why I've renamed it "The Mother of All Cakes!" I've never made anything quite this glorious before.

Whilst making the cake, be extra careful not to burn the caramel. It is important to put the cream on the heat at the same time as the sugar/syrup mixture, as it takes longer than you think to come to the boil. The first time I tried to make the caramel, I put the cream on the heat too late and ended up burning the sugar/syrup mixture waiting for the cream to boil! Trust me, burnt caramel does NOT taste good, as my Mother (aka resident bowl-licker) will testify! This resulted in an emergency trip to our local shop (who were blessed with the sight of me in my pajamas, no bra and a very chocolatey apron) to get extra cream.

Here's the recipe, ever so slightly amended from the Hummingbird Bakery book:

Ingredients:
For the sponge:
300g unsalted butter
300g caster sugar
140g soft light brown sugar
100g cocoa powder
160ml buttermilk
1tsp vanilla essence
330g plain flour
2tsp baking powder
1tsp bicarbonate of soda
1/2 tsp salt
For the salty caramel:
200g caster sugar
2 tbsp golden syrup
120ml double cream
60ml soured cream
1tsp fine sea salt
For the frosting:
200g caster sugar
2 tbsp golden syrup
360ml double cream
450g dark chocolate
450g unsalted butter (NB - I used slightly less than this, probably about 420g, but judge for yourself.)

Method:
First make the salty caramel. In a small saucepan, bring the sugar and golden syrup to the boil with 60ml of water. Allow the mixture to boil for about 10 minutes, during which time it should become quite syrupy and a rich caramel colour.


Put the double cream, soured cream and salt in a separate pan and bring to the boil, then remove from the heat. When the sugar syrup is ready, remove it from the heat and carefully add the hot cream. It will bubble up as you pour in the cream, but smooth out again quickly to become a creamy golden colour. Pour the caramel into a small bowl and set aside to cool while you make the frosting.


For the frosting: In a small, clean saucepan bring the caster sugar and golden syrup to the boil with 60ml of water, again letting this boil for approximately 10 minutes. In a separate pan, bring the double cream to the boil. Carefully pour the hot cream onto the boiled caramel. Set this caramel aside to cool slightly.

Once it has cooled, add the chopped chocolate, stirring constantly while the chocolate melts. Using a hand held electric whisk, mix the frosting for about 10 minutes, or until the bottom of the bowl feels cool. Add the butter to the chocolate-caramel frosting and whisk together until the mixture is light and looks slightly whipped. Place the frosting in the fridge to cool while you make the sponge. (you might not want to add all the butter)


EXTRAVAGANTLY SPOON THE FROSTING IN GLORIOUS MOUTHFULS INTO YOUR EAGERLY AWAITING JAWS AND LAUGH GLEEFULLY WITH CHOCOLATEY ECSTASY-... oh wait, no, don't do this. Well, at least try not to.

Preheat the oven to 170 degrees Celsius and line the bases of the sandwich tins with parchment.

Cream together the butter and both types of sugar until light and fluffy. Add the eggs one at a time, mixing well after each addition and scraping down the sides of the bowl.


In a jug, stir together the cocoa powder, buttermilk and vanilla essence with 60ml of water to form a thick paste.

Sift together the remaining sponge ingredients, and then add them in stages to the creamed butter and sugar, alternating with the cocoa powder paste and mixing thoroughly.


Divide the butter between the three prepared cake tins and bake for approximately 25 minutes or until the top of the sponge feels springy. (NB - Mine took slightly longer than this, 28 minutes in the end.) Remove from the oven and allow the sponges to cool slightly in their tins before turning out onto a wire rack to cool completely.


Once the sponges are cool, place one on a plate and top with approximately two tablespoons of the salty caramel, smoothing it over the sponge with a palette knife. Top the caramel layer with 3-4 tablespoons of the frosting and smooth it out as before.


Continue this process, sandwiching together the two other sponges with the remaining salty caramel and a layer of frosting. When all three sponges are sandwiched together, cover the top and sides of the cake with the remaining frosting. Decorate as you please.


This cake certainly took a little longer in the kitchen, but that time was certainly well worth the impressive end result. Cutting into the cake to find oozing caramel swirled with creamy dark chocolate frosting was a mouth-watering experience, and I have no doubt Ian will have taken this cake home and demolished it in no time! 


Here's a snap of the lovely Ian himself cutting into the cake. It was a really lovely day and wonderful to see someone we all value so much, and I was chuffed to bits to be able to give something to him that I knew he would enjoy. It just goes to show, however cliche it may be, that the best thing about baking truly is the sharing.

Tuesday, 25 June 2013

Chocolate Honeycomb Truffle Cake


First of all, an apology to any regular readers (if I possess any of those!) about my shameful lack of blogging recently. A very busy schedule, including a music festival and my boyfriend visiting, and a couple of disasters in the kitchen (which I blame entirely on the hot weather) are to blame for the lack of bloggable content.

But I am finally back in the kitchen with my eldest sister, Anna's, birthday looming. Birthdays in my family are always exciting occasions, but even more so when said sister has a very cute baby!

Anna's sweet tooth is even more difficult to satisfy than mine, and she requested the most chocolatey decadent cake imaginable.

Ingredients:
For the cake:
450g self raising flour
6tbsp cocoa powder
450g butter
450g caster sugar
8 eggs
For the truffles:
100g good quality dark chocolate
100ml double cream
2-3 tsp of your favorite liqueur (optional)
cocoa powder (to dust)
For the honeycomb:
80g butter
160g caster sugar
80g golden syrup
2tsp bicarbonate of soda
For the frosting:
250ml double cream
300g good quality dark chocolate
20g butter

*NB - I actually didn't follow the stated truffle recipe but used Edd Kimber's Salted Caramel Truffles, as my sister requested. Jeez, she doesn't want much!*

Method:
Preheat the oven to 180 degrees Celsius (fan 160). Grease and line two 20cm round springform cake tins.

Start by making the mixture for the truffles. Place the chopped dark chocolate in a bowl. Heat the cream in a small saucepan until it is almost at boiling point, then remove from the heat and pour over the chocolate. Stir gently until the chocolate has melted, then stir in your chosen liqueur. Pour the mixture into a small, shallow dish, and leave to cool before placing in the fridge to firm up.

Next, make the honeycomb. Line a baking tray with non stick baking paper. Place all the ingredients except the bicarbonate of soda in a pan over a low heat to melt , then very slowly bring to the boil. Boil gently until the mixture turns a deep golden brown honeycomb colour. Do NOT stir the mixture; if it starts to colour more on one side then just give it a gentle swirl.

Once a golden colour has been achieved (should take about 5 minutes), remove from the heat and add the bicarbonate of soda. Stir in gently, it will cause the mixture to expand. Pour into the lined tray and leave to cool and set. Break into chunks and store in an airtight container until needed.


To make the sponges, place the measured flour in a bowl, then remove six tablespoons and return them to the bag. Replace with the cocoa powder. Add the remaining cake ingredients to the bowl and whisk thoroughly. Divide the mixture between the tins, spreading it evenly, Bake for about 1 hour or until a skewer inserted into the centre of each cake comes out clean. Turn out onto a wire rack to cool completely. (useless blogger, aka me, forgot to take photos..)


To make the frosting, bring the cream just to boiling point then remove from the heat and set aside. Melt the chocolate in a bowl set over a pan of gently simmering water. Remove from the heat then stir into the warm cream, then add the butter.


To assemble the cake, make sure the sponges are level when they are ontop of eachother. Grind half of the honeycomb in a food processor (or beat it up in a sandwich bag with a rolling pin). Place 5 tablespoons of the ganache mixture in a bowl and stir in the ground up honeycomb to give a fairly thick mixture - this will be the filling.

Sandwich the sponges together with the honeycomb chocolate filling, then use the remaining ganache to cover the top and sides of the cake.

Finally, finish the truffles. Dust your hands with some cocoa powder, hen take teaspoon sized amounts of the truffle mixture and roll into small balls, until all the mixture has been used. Dust the balls with cocoa powder. Decorate the cake with the truffles and honeycomb.


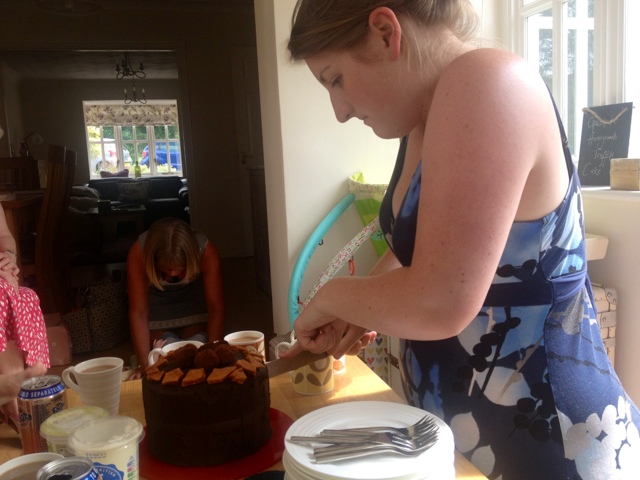
Please admire my new slate board (which I definitely shouldn't be so excited about). I purchased it at Gloucester Quays Food Festival this weekend, which I shall tell you all about soon! Here's a photo of Anna slicing into this glorious creation; I assure you that very little now remains!


If I were to make this cake again (which I probably will!), I think i'd substitute some of the dark chocolate in the ganache with milk chocolate to make it a little less rich. And I would definitely invest in some crunchies (one for the cake, two for me...) to crumble over top! 

If you like the look of this then you'll definitely like this Salted Caramel Chocolate Cake and these gooey Salted Caramel Brownies.