Showing posts with label chocolate. Show all posts

Sunday, 21 July 2013

Salted Caramel Truffles


(Please excuse the ginormous gap at the opening of this post, I am on the verge of having a blogspot induced nervous breakdown where formatting is concerned.)

Courtesy of Edd Kimber's beautiful book "Say It With Cake", these truffles only served as fuel to my current salted caramel addiction. They were requested by my sister especially to top her Chocolate Truffle and Honeycomb Cake, the recipe for which will be up soon! 

They come with a warning though; it is hopelessly difficult to bake anything with salted caramel in it without devouring all the caramel before actually using it... and consuming one's body weight in salted caramel can't be healthy. 

Here's the recipe:

Ingredients:
300g dark chocolate 
300g caster sugar 
300ml double cream
1/2 tsp vanilla extract
20g light brown sugar 
20g unsalted butter 
1/2 tsp flaked sea salt 
cocoa powder, for dusting 

Method:
Put the chocolate in a medium heatproof bowl and set aside. Put the caster sugar in a medium pan over medium heat and leave until the sugar begins to dissolve and caramelize around the edges. Using a silicon spatula, drag the dissolved sugar towards the middle to help it dissolve evenly.

Once the sugar is fully dissolved and has turned a dark golden brown colour, pour in half the cream, and all the vanilla and light brown sugar, it will bubble up furiously, so be careful and go sl
owly. Once the bubbling has subsided, add the remaining cream. If the caramel is lumpy, put over a low heat and allow to melt. Once you have a smooth caramel, add the butter and sea salt, and stir gently to combine. 

Pour the hot caramel over the chocolate and stir gently to combine. Chill until firm enough to roll into balls. 

To make the truffles, have a small bowl of cocoa powder ready and a baking tray lined with baking parchment. Take large teaspoons of the ganache mixture and roll into balls, then roll in the cocoa powder and set on the baking tray. Chill the truffles until needed. 

Maybe it has something to do with my distinct lack of hand-eye coordination, but when making these I discovered I am completely useless at rolling things into ball shapes. Hence, these were more of squashed spheres. But that just adds to the authenticity really, doesn't it? I hope Edd would agree. 

These would make a perfect gift, just like my Fresh Blueberry Marshmallows!

Saturday, 29 June 2013

The Mother of All Cakes


Initially named "Sweet n Salty Chocolate Cake",  I've wanted to bake this for a very very long time, and my (Honorary) Grandpa Ian's birthday provided the perfect opportunity. The story behind the "honorary" epithet is long. Basically, despite not being a blood relation, Ian has for some time now been an essential member of our family. He holds an important part in all of our hearts, hence why we wanted to make his 80th birthday extra special for him. Until recently, I hadn't seen him for over a year, but this Saturday we all went down to London to celebrate with him. We all turned up at his favorite restaurant to surprise him with lunch, a day out, and of course - a rather magnificent cake.

At Christmas time, we always used to joke about how Ian could manage one of every pudding: and there were usually five or six options! He has an insatiable sweet tooth, something that I never cease to try and satisfy. Hopefully, this cake will do the trick! The sheer volume of sugar and glorious fatty goodness is just too decadent for anyone to pass up, especially Ian. This is why I've renamed it "The Mother of All Cakes!" I've never made anything quite this glorious before.

Whilst making the cake, be extra careful not to burn the caramel. It is important to put the cream on the heat at the same time as the sugar/syrup mixture, as it takes longer than you think to come to the boil. The first time I tried to make the caramel, I put the cream on the heat too late and ended up burning the sugar/syrup mixture waiting for the cream to boil! Trust me, burnt caramel does NOT taste good, as my Mother (aka resident bowl-licker) will testify! This resulted in an emergency trip to our local shop (who were blessed with the sight of me in my pajamas, no bra and a very chocolatey apron) to get extra cream.

Here's the recipe, ever so slightly amended from the Hummingbird Bakery book:

Ingredients:
For the sponge:
300g unsalted butter
300g caster sugar
140g soft light brown sugar
100g cocoa powder
160ml buttermilk
1tsp vanilla essence
330g plain flour
2tsp baking powder
1tsp bicarbonate of soda
1/2 tsp salt
For the salty caramel:
200g caster sugar
2 tbsp golden syrup
120ml double cream
60ml soured cream
1tsp fine sea salt
For the frosting:
200g caster sugar
2 tbsp golden syrup
360ml double cream
450g dark chocolate
450g unsalted butter (NB - I used slightly less than this, probably about 420g, but judge for yourself.)

Method:
First make the salty caramel. In a small saucepan, bring the sugar and golden syrup to the boil with 60ml of water. Allow the mixture to boil for about 10 minutes, during which time it should become quite syrupy and a rich caramel colour.


Put the double cream, soured cream and salt in a separate pan and bring to the boil, then remove from the heat. When the sugar syrup is ready, remove it from the heat and carefully add the hot cream. It will bubble up as you pour in the cream, but smooth out again quickly to become a creamy golden colour. Pour the caramel into a small bowl and set aside to cool while you make the frosting.


For the frosting: In a small, clean saucepan bring the caster sugar and golden syrup to the boil with 60ml of water, again letting this boil for approximately 10 minutes. In a separate pan, bring the double cream to the boil. Carefully pour the hot cream onto the boiled caramel. Set this caramel aside to cool slightly.

Once it has cooled, add the chopped chocolate, stirring constantly while the chocolate melts. Using a hand held electric whisk, mix the frosting for about 10 minutes, or until the bottom of the bowl feels cool. Add the butter to the chocolate-caramel frosting and whisk together until the mixture is light and looks slightly whipped. Place the frosting in the fridge to cool while you make the sponge. (you might not want to add all the butter)


EXTRAVAGANTLY SPOON THE FROSTING IN GLORIOUS MOUTHFULS INTO YOUR EAGERLY AWAITING JAWS AND LAUGH GLEEFULLY WITH CHOCOLATEY ECSTASY-... oh wait, no, don't do this. Well, at least try not to.

Preheat the oven to 170 degrees Celsius and line the bases of the sandwich tins with parchment.

Cream together the butter and both types of sugar until light and fluffy. Add the eggs one at a time, mixing well after each addition and scraping down the sides of the bowl.


In a jug, stir together the cocoa powder, buttermilk and vanilla essence with 60ml of water to form a thick paste.

Sift together the remaining sponge ingredients, and then add them in stages to the creamed butter and sugar, alternating with the cocoa powder paste and mixing thoroughly.


Divide the butter between the three prepared cake tins and bake for approximately 25 minutes or until the top of the sponge feels springy. (NB - Mine took slightly longer than this, 28 minutes in the end.) Remove from the oven and allow the sponges to cool slightly in their tins before turning out onto a wire rack to cool completely.


Once the sponges are cool, place one on a plate and top with approximately two tablespoons of the salty caramel, smoothing it over the sponge with a palette knife. Top the caramel layer with 3-4 tablespoons of the frosting and smooth it out as before.


Continue this process, sandwiching together the two other sponges with the remaining salty caramel and a layer of frosting. When all three sponges are sandwiched together, cover the top and sides of the cake with the remaining frosting. Decorate as you please.


This cake certainly took a little longer in the kitchen, but that time was certainly well worth the impressive end result. Cutting into the cake to find oozing caramel swirled with creamy dark chocolate frosting was a mouth-watering experience, and I have no doubt Ian will have taken this cake home and demolished it in no time! 


Here's a snap of the lovely Ian himself cutting into the cake. It was a really lovely day and wonderful to see someone we all value so much, and I was chuffed to bits to be able to give something to him that I knew he would enjoy. It just goes to show, however cliche it may be, that the best thing about baking truly is the sharing.

Tuesday, 25 June 2013

Chocolate Honeycomb Truffle Cake


First of all, an apology to any regular readers (if I possess any of those!) about my shameful lack of blogging recently. A very busy schedule, including a music festival and my boyfriend visiting, and a couple of disasters in the kitchen (which I blame entirely on the hot weather) are to blame for the lack of bloggable content.

But I am finally back in the kitchen with my eldest sister, Anna's, birthday looming. Birthdays in my family are always exciting occasions, but even more so when said sister has a very cute baby!

Anna's sweet tooth is even more difficult to satisfy than mine, and she requested the most chocolatey decadent cake imaginable.

Ingredients:
For the cake:
450g self raising flour
6tbsp cocoa powder
450g butter
450g caster sugar
8 eggs
For the truffles:
100g good quality dark chocolate
100ml double cream
2-3 tsp of your favorite liqueur (optional)
cocoa powder (to dust)
For the honeycomb:
80g butter
160g caster sugar
80g golden syrup
2tsp bicarbonate of soda
For the frosting:
250ml double cream
300g good quality dark chocolate
20g butter

*NB - I actually didn't follow the stated truffle recipe but used Edd Kimber's Salted Caramel Truffles, as my sister requested. Jeez, she doesn't want much!*

Method:
Preheat the oven to 180 degrees Celsius (fan 160). Grease and line two 20cm round springform cake tins.

Start by making the mixture for the truffles. Place the chopped dark chocolate in a bowl. Heat the cream in a small saucepan until it is almost at boiling point, then remove from the heat and pour over the chocolate. Stir gently until the chocolate has melted, then stir in your chosen liqueur. Pour the mixture into a small, shallow dish, and leave to cool before placing in the fridge to firm up.

Next, make the honeycomb. Line a baking tray with non stick baking paper. Place all the ingredients except the bicarbonate of soda in a pan over a low heat to melt , then very slowly bring to the boil. Boil gently until the mixture turns a deep golden brown honeycomb colour. Do NOT stir the mixture; if it starts to colour more on one side then just give it a gentle swirl.

Once a golden colour has been achieved (should take about 5 minutes), remove from the heat and add the bicarbonate of soda. Stir in gently, it will cause the mixture to expand. Pour into the lined tray and leave to cool and set. Break into chunks and store in an airtight container until needed.


To make the sponges, place the measured flour in a bowl, then remove six tablespoons and return them to the bag. Replace with the cocoa powder. Add the remaining cake ingredients to the bowl and whisk thoroughly. Divide the mixture between the tins, spreading it evenly, Bake for about 1 hour or until a skewer inserted into the centre of each cake comes out clean. Turn out onto a wire rack to cool completely. (useless blogger, aka me, forgot to take photos..)


To make the frosting, bring the cream just to boiling point then remove from the heat and set aside. Melt the chocolate in a bowl set over a pan of gently simmering water. Remove from the heat then stir into the warm cream, then add the butter.


To assemble the cake, make sure the sponges are level when they are ontop of eachother. Grind half of the honeycomb in a food processor (or beat it up in a sandwich bag with a rolling pin). Place 5 tablespoons of the ganache mixture in a bowl and stir in the ground up honeycomb to give a fairly thick mixture - this will be the filling.

Sandwich the sponges together with the honeycomb chocolate filling, then use the remaining ganache to cover the top and sides of the cake.

Finally, finish the truffles. Dust your hands with some cocoa powder, hen take teaspoon sized amounts of the truffle mixture and roll into small balls, until all the mixture has been used. Dust the balls with cocoa powder. Decorate the cake with the truffles and honeycomb.


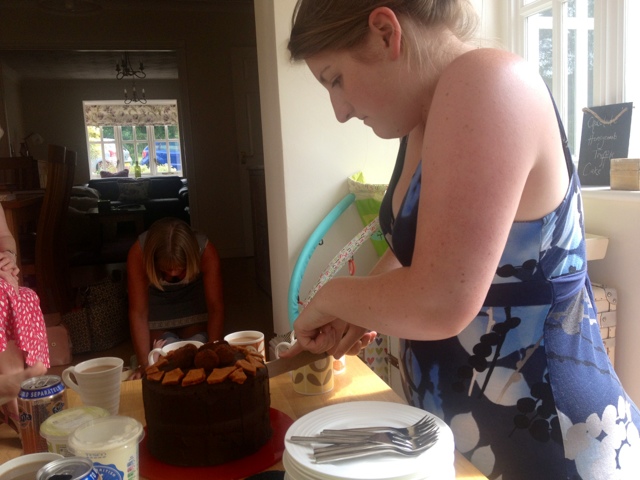
Please admire my new slate board (which I definitely shouldn't be so excited about). I purchased it at Gloucester Quays Food Festival this weekend, which I shall tell you all about soon! Here's a photo of Anna slicing into this glorious creation; I assure you that very little now remains!


If I were to make this cake again (which I probably will!), I think i'd substitute some of the dark chocolate in the ganache with milk chocolate to make it a little less rich. And I would definitely invest in some crunchies (one for the cake, two for me...) to crumble over top! 

If you like the look of this then you'll definitely like this Salted Caramel Chocolate Cake and these gooey Salted Caramel Brownies.

Saturday, 22 June 2013

Layered Chocolate Vanilla Cupcakes


Exams are over and summer is here at long last. I'm back at home after a few well needed days of rest and recuperation. Needless to say, exams at Oxford are like being put through a high speed blender on a roller coaster: not fun.

However, i'm back in the kitchen after a fair few days of slobbing around the house in my pajamas, and ready to return to Oxford on Wednesday for some much needed celebrations with my friends. And of course, I cannot return to many stressed historians without some cake to get them through long hours of revision.

I decided something simple, but undoubtedly yummy, was needed, and Hummingbird (once again) provided the perfect recipe: chocolate and vanilla cupcakes. A yummy infusion of milky chocolate and vanilla sponge, topped with decadent swirled chocolate frosting. Who could say no?

Ingredients:
For the cake:
80g unsalted butter
280g caster sugar
240g plain flour
1 tbsp baking powder
20g cocoa powder
2 large eggs
240ml whole milk
1/2 tsp vanilla essence
For the chocolate frosting:
200g icing sugar
50g cocoa powder
80g unsalted butter
25ml whole milk
For the vanilla frosting:
250g icing sugar
80g unsalted butter
25ml whole milk
1/2 tsp vanilla essence

Method:
Preheat the oven to 190 degrees Celcius, and line a cupcake tin with cases.

First make the flavoured sponges. Using a handheld electric mixer, beat together half each of the butter, sugar, flour and baking powder, along with all the cocoa powder, until it resembles breadcrumbs.


Whisk the egg with the milk by hand in a jug, then pour half of this into a second mug and set aside for the vanilla sponges. (As usual, i've been a useless blogger and forgotten to take photos during the baking process!)

Take the first jug of egg/milk mixture, pour three quarters if it into the dry chocolate sponge mixture and mix on a low speed. Add the remaining quarter of the egg mixture from the first jug and continue to mix on a low speed until all the ingredients are well incorporated.

For the vanilla sponge, beat together the remaining butter, sugar, flour and baking powder until it resembles fine bread crumbs. Add three quarters of the milk/egg mixture and beat well. Add the remaining egg/milk mixture and beat on a medium speed until well incorporated.

Divide the chocolate batter between the cupcake cases, filling each by about a third. Top with the same quantity of vanilla batter.

Bake in the preheated oven for 18-20 minutes or until well risen and springy. Let the cupcakes cool in the tin for a few minutes before transferring to a wire rack to cool completely.


To make the chocolate frosting, whisk the icing sugar with the cocoa powder and butter on a low speed. Pour in the milk, still whisking on a low speed, and beat until soft and fluffy.

Repeat for the vanilla icing, but omit the cocoa powder.

Ice the cupcakes by swirling both the chocolate and vanilla icing onto the cupcakes with a palette knife. Or alternatively, place the icings side by side in a piping bag and pipe swirls onto your cupcakes.


This Marbled Chocolate Cake is very similar and perfect for a chocoholic's birthday cake!

Tuesday, 11 June 2013

Chocolate Cherry Muffins


Since going to Oxford, I have developed a love of dark chocolate. The darker the better. My friend Rachel always has lindt dark chocolates in her room, and just one is enough to satisfy me, rather than the gluts of milk chocolate I could gobble.

I've never really baked with cherries either, so this recipe (found in Paul Hollywood's "How to Bake") really tempted me:

Ingredients:
200g unsalted butter
150g caster sugar 
4 medium eggs
200g strong white bread flour 
1 and a 1/2 tsp baking powder
pinch of salt 
splash of milk
150g good quality dark chocolate (sainsbury's dark cook's chocolate is to die for - I used 200g for an extra chocolatey hit)
470g jar pitted morello cherries, drained (I couldn't find morello cherries so just used black cherries in syrup, and it was still delicious!) 

Method:
Heat your oven to 200 degrees Celsius. Put twelve paper cases into a muffin tray, or line the moulds with scrunched squares of baking parchment.

Cream the butter and sugar together in a large bowl until light and fluffy. Beat in the eggs, one at a time. Sift the flour and baking powder and salt together over the mixture and fold in lightly. Add the milk and stir in, but be careful to not over-mix the mixture. (the mixture is quite runny but do not fear!)

Add the chocolate and two thirds of the cherries and fold in, until just combined.  

Divide the mixture evenly between the cases and press the remaining cherries into the top of each one. Bake in the pre-heated oven for 15-20 minutes until the muffins are firm and spring back when lightly pressed.

Compulsory photo in the sunshine
I'm afraid i'm a useless blogger and forgot to take photos AGAIN for this one - but the recipe is pretty self explanatory really! I usually find muffins quite dry, but these were beautifully moist and the chocolate/cherry flavours compliment each other beautifully.

I can't wait to experiment with this muffin recipe; i'm thinking white chocolate and raspberry next...

Happy baking x

P.S These cupcakes also use cherries, and are a perfect Easter treat. Or, if you fancy a muffin but aren't a cherry fan check out these Rhubarb and Custard Muffins! 

Tuesday, 9 April 2013

Chocolate Marble Cake

WARNING - IF YOU ARE ON A DIET, AVERT YOUR EYES NOW.


Don't be deceived, it's not a giant party ring biscuit. It is, in fact, Mary Berry's marbled chocolate cake; gloriously decadent, and perfect for a birthday party or genuinely just to impress your friends.

Unfortunately I didn't take a photo of the cake after it was sliced, but the effect inside is brilliant. Splodging the cake mixture around the tin, then adding chocolate cake mixture in dots on top and swirling them together, leaves you with a stunning marbled effect - everyone will think you're a baking genius when really it's quite simple :)

225g softened butter
225g caster sugar
4 large eggs
225g self raising flour
2 level teaspoons baking powder
1 and 1/2 level teaspoons cocoa powder
1 and 1/2 tablespoons of hot water
150g plain chocolate (for the icing)
2 tablespoons water
100g butter
50g belgian milk chocolate OR white chocolate (Mary uses milk for the drizzle, but I think white looks more impressive!)

Preheat the oven to 180 degrees Celsius (Fan 170). Grease a 1.75 ring mould.

Measure all the cake ingredients, except the cocoa and water into a large bowl. Beat until thoroughly blended. Dot about half of this mixture, in teaspoons, into the base of the prepared tin.

Mix the cocoa and hot water together in a small bowl then mix into the remaining cake mixture. Dot this mixture over and between the cake mixture already in the tin. Swirl a little with a knife, then carefully level the surface.

Bake in the preheated oven for about 40 minutes or until well risen and the top of the cake springs back when lightly touched. Leave to cool in the tin for a few minutes then transfer to a wire rack to cool completely.

To make the icing, break the plain chocolate into pieces, then melt it gently with the butter and water in a bowl over a pan of simmering water. Pour over the cake and then leave to set for about 1 hour. Break the white or milk chocolate into a bowl and melt over a pan of simmering water. Spoon into a piping bag, snip off the end, and drizzle the chocolate over the cake. (It is worth putting a sheet of greasepoof paper under the cake when you ice it, to save making a mess of the kitchen sides!)

*Happy Baking*

PS. Choc-a-holic? Whip up a batch of my Best Ever Triple Chocolate Brownies or Millionaire's Shortbread.

Monday, 8 April 2013

Salted Caramel "Surprise" Brownies


Salted caramel is a huge craze at the moment, and i'm all for jumping on the band wagon and going along with it when it comes to something this delicious. Today, in honour of a get together with old friends for a 19th birthday, I made Edd Kimber's Salted Caramel Brownies. Delicious fudgy chocolate brownies with a layer of sweet and salty caramel baked into the middle - bite size heaven. The recipe for these can be found on Edd's blog here.

However, as I was making these, I had a few baking mishaps which turned them into salted caramel "surprise" brownies; the reason for which will soon become obvious. Here's the recipe:

Salted Caramel Filling
175g caster sugar
150ml double cream
10g unsalted butter
large pinch of flaked sea salt

Fudge Brownies
180g plain flour
3 tbsp cocoa powder
1/4 tsp salt
300g dark chocolate, around 65-75% cocoa solids
150g unsalted butter
220g light brown sugar
150g caster sugar
4 large eggs
1 tsp vanilla extract

To make the caramel, heat the sugar in a medium pan over a medium heat until it is browning and melting around the edges - make sure to cook it far enough – it should look like the colour of an old penny. Pour in half the cream and all the salt, be careful the mixture will bubbly up violently.


The melted sugar
Once the mixture has calmed down pour in the remaining cream followed by the butter, if there are any lumps place the pan back on the heat and stir until smooth. Take off the heat and allow to cool and then pour into a squeeze bottle (this makes it easier to spread the caramel later).*I didn't use a squeeze bottle, just poured it into a jug and used the jug to pour it evenly over the brownie mixture*

After the cream has been added.
For the brownies preheat the oven to 180°C/160°C fan. Grease a 9×13 light coloured pan and line with a strip of parchment leaving about a 2-inch overhang along the long edges to make removing the brownies easier. Sieve the flour, cocoa powder and salt together into a medium bowl and set aside. 

Place the chocolate and butter into a heatproof bowl and set over a pan of simmering water, making sure the bowl doesn’t touch the water, and stir occasionally until the mixture is fully melted. Take the bowl of the heat and add the eggs, sugars and vanilla and beat until the mixture is smooth. Sieve over the flour mixture and gently fold together.  

*This is where I went a little wrong. It is advisable, to CHECK the bottle of vanilla essence you take out of the cupboard is actually vanilla essence.... not almond essence. Hence the "surprise" of these brownies is that they are also slightly almondy, due to me not checking the label on the bottle first! Oops!*


Divide the mixture equally in half and spread out the first half into the prepared tin. Using the squeeze bottle pour the caramel over the batter leaving a 1 1/2 cm border around the outside. You now need to spread the remaining batter over the caramel and this bit can be a little tricky. Edd suggests using a piping bag to pipe the remaining brownie mixture evenly over the top of the caramel, but I simply draped it over straight from the bowl and this worked nicely.

Ready for the oven
Bake in the preheated oven for 25-30 until the a skewer inserted into the middle comes out with just a few moist crumbs attached, you don't want raw batter. Allow to cool completely before using a sharp knife to cut into squares. *I found that the brownie actually took closer to 40 minutes to bake properly*

Out of the oven - if only you could smell a picture...
Makes 15 perfect squares of oozy gooey goodness :) (12 if you fancy a slightly  bigger brownie.)
It just goes to show that no matter what your baking experience, everyone has a mishap occasionally, and these still tasted yummy despite being a little.. err.. nutty. It reminds me of a time many Hereford friends will remember when my Mum accidentally drizzled Vanilla Syrup all over pizzas (instead of olive oil) before cooking them!

Happy Baking! x